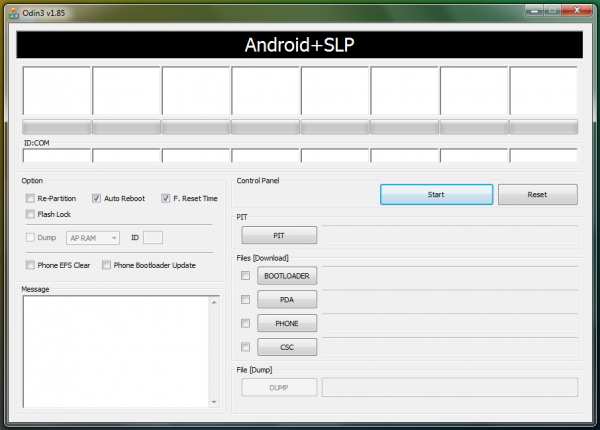
A bit ago, Samsung released XXLPZ Android 4.1.2 firmware update for Samsung Galaxy S Advance I9070 i.e. Jelly Bean software update. This update was quite awaited before but updating the phone right to Jelly Bean without being updated to Ice Cream Sandwich is a complete surprise for everybody. XXLPZ Android 4.1.2 official firmware has the capacity to be installed easily on your Galaxy S Advance with the help of ODIN or you have the option to update your phone with Samsung KIES with ease. You also have the chance to install XXLPZ Android 4.1.2 on Galaxy S Advance I9070 from the tutorial that is provided below. You are not required to have ClockworkMod custom recovery already installed for this particular tutorial.
As you continue reading, you will be guided through the complete process that will tell you how to update Galaxy S Advance I9070 to XXLPZ Android 4.1.2 Jelly Bean official firmware with the help of ODIN. Things to be remembered are told to you. Let’s proceed with the tutorial now.

XXLPZ Android 4.1.2 Firmware Details:
PDA: I9070XXLPZ
CSC: I9070SERLPZ
Version: 4.1.2
Date: 2013-01-03
Regions: Austria, Belgium, France, Germany, Hungary, Italy, Spain, United Kingdom
CSC: I9070SERLPZ
Version: 4.1.2
Date: 2013-01-03
Regions: Austria, Belgium, France, Germany, Hungary, Italy, Spain, United Kingdom
HOW TO INSTALL ANDROID 4.1.2 XXLPZ ON GALAXY S ADVANCE I9070
Here is a detailed step-by-step instructions guide that will tell me how to update Samsung Galaxy S Advance to XXLPZ Android 4.1.2 Jelly Bean. If you are familiar with installing official updates using ODIN on Samsung Galaxy devices, then this should not be a big deal for you.
You must read every line with great care and ensure that you read the complete tutorial at least once before you actually perform it on your phone.

To Remember:
- This tutorial is just for Samsung Galaxy S Advance I9070. You must not try this on any other variants of the phone.
- This is an official firmware by Samsung and must not be considered a modified or a custom ROM.
- You must ensure that you backup all your data in your phone before you proceed.
Download Android USB Drivers to connect your device with your PC.
Backup Guides:
Rooting Warning: This is an official Android 4.1.2 XXLPZ update for Galaxy S Advance I9070, that clearly implies that you will lose root instantly as you install this update. You will once again have to root Galaxy S Advance in order to gain full system access and be able to install root apps again.
Tutorial to Update Galaxy S Advance I9070 to XXLPZ Android 4.1.2 Jelly Bean Official Firmware
Step 1 - First thing to do is Download Android 4.1.2 I9070XXLPZ for Galaxy S Advance to your computer and extract the zip file.
Step 2 - After that Download ODIN v1.85 that is going to help you to install Android 4.1.2 on Samsung Galaxy S Advance I9070.
Step 3 - Thirdly you must switch OFF your phone. After that go to Download Mode. Thinking, How? The answer is that press and hold the Volume Down + Home buttons altogether, and after that press the Power button till you see the construction Android robot and a triangle. Press Power once again to confirm to enter into Download Mode.
Step 4 - You must ensure that you have your Galaxy S Advance USB drivers installed on your computer already.
Step 5 - You are required to open ODIN on your computer. You must connect your phone to your computer meanwhile your phone is in the Download Mode.
Step 6 - If your phone is successfully connected, as an indication one of the ID:COM boxes will turn yellow with the COM port number. This step is likely to take some time.
Step 7 - Now you are required to select the files that you have to flash/install on your phone. These files are to be found from the extracted files in Step 1.
- Here, click on ‘PDA’ and select file with ‘CODE’ in its name.
- Now, click on ‘Phone’ and select file with ‘MODEM’ in its name. Skip this step if there is no such file.
- Now, click on ‘CSC’ and select file with CSC’ in its name. Skip this step if there is no such file.
- Here, click on ‘PIT’ and select the .pit file. Overlook this step if there is no such file.
Step 8 - Once you are in ODIN, you are required to check the Auto Reboot and F. Reset Time options. As for the Re-Partition option, you must check it ONLY if you selected a .PIT file in the last step.
Step 9 - Now you are required to click on the Start button in ODIN. Installation process will now begin and is likely to take a few minutes in order to finish up.
Step 10 - Once the installation gets completed, your phone will restart. After you come across the home screen, you may now unplug your phone from the computer.
No comments:
Post a Comment